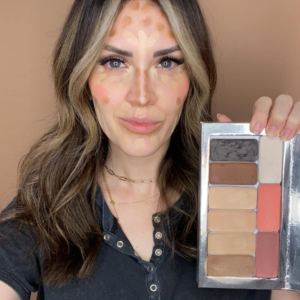
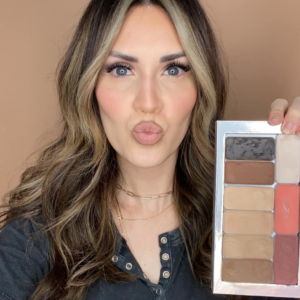
The story of Seint makeup begins with the vision of Cara Brook, a makeup artist driven by a desire to redefine the beauty routine. Frustrated with the complexities and time-consuming nature of traditional makeup application, Cara set her sights on a more streamlined, intuitive system. She envisaged a method that would not only cut down on the time required to achieve a polished look but also empower individuals to enhance their natural beauty without resorting to layers of heavy makeup. This led to the birth of the ‘Paint By Numbers’ approach, a nod to the simplicity and ease of painting by numbers, which guides even the most inexperienced painters to create art effortlessly. With this concept, Cara aimed to demystify makeup application, making it accessible and enjoyable for everyone, regardless of their skill level. The innovation didn’t stop with the method; it extended to the formulation of the products themselves. Cara focused on developing cream-based makeup that would complement the simplicity of the application process, ensuring a seamless, natural finish. This combination of unique application technique and product formulation is what sets Seint makeup apart in the crowded beauty market, marking a new chapter in makeup application that emphasizes ease, efficiency, and the celebration of innate beauty.
Cream makeup, known for its unparalleled ability to meld with the skin, offers a distinctive advantage over traditional powder formulations. Its creamy texture ensures that it glides smoothly onto the skin, facilitating a blending process that feels more like skincare than makeup application. This ease of blending is particularly beneficial for achieving a look that’s both polished and natural. At the heart of cream makeup’s appeal is its versatility. Its formula allows for a sheer application that can effortlessly be built up to a full coverage, catering to a wide range of preferences and needs. This adaptability makes cream makeup an excellent choice for those seeking to create both understated daytime looks and more dramatic evening aesthetics without changing product types. Moreover, cream makeup stands out for its staying power. Its formulations are designed to lock in moisture, preventing the makeup from settling into fine lines or becoming cakey over time. This results in a luminous, dewy finish that not only enhances the skin’s natural glow but also maintains its integrity throughout the day. For individuals with dry or mature skin, cream makeup can be particularly flattering, offering hydration and a youthful radiance that powder products cannot match.
Diving into the world of contouring with Seint IIID Foundation offers a transformative experience that sculpts and defines your facial features. Select the contour shade that’s a few tones darker than your natural skin color for the most natural-looking shadow. Using a contour brush, map out the areas you wish to define, such as the hollows of your cheeks, the sides of your nose, and the perimeter of your forehead. The aim here is to mimic the natural shadows of your face, enhancing your structure in a subtle yet impactful way. Apply the contour shade with precision, keeping the lines as neat as possible initially. The magic lies in the blend, but starting with careful application ensures that the final look is polished and refined. For those looking to add extra definition, a touch of contour under the jawline sharpens the chin and enhances the neck’s natural lines. As you become more comfortable with contouring, you can experiment with different intensities and placements to discover what best accentuates your unique facial features. The beauty of Seint IIID Foundation is in its blendability, allowing for seamless integration of contour and highlight, leading to a beautifully sculpted face that shines with dimension and depth.


Selecting the ideal color correcting foundation shade is crucial for camouflaging imperfections and ensuring an even skin tone under your Seint IIID Foundation. Begin by identifying the specific concerns you wish to address, such as redness, dark circles, or hyperpigmentation. Blend softly to avoid harsh lines, ensuring the corrector merges seamlessly with your skin. This preparatory step enhances the overall effect of your IIID Foundation, creating a flawless canvas for the subsequent highlight and contour application. Keep the application of color corrector focused and minimal to prevent any cakiness and maintain the cream makeup’s natural, skin-like finish.
Incrementally build up coverage in areas that require more attention, taking care not to overload the skin with product. The beauty of Seint cream makeup lies in its buildability and versatility, allowing for both minimal coverage in places where your natural skin should shine through and fuller coverage where needed. By focusing on a gradual, layered application, you encourage a more personalized finish that adheres beautifully to your skin, reflecting your individual beauty and the unique contours of your face.


The key lies in finding a shade that illuminates your complexion while still blending flawlessly with your natural skin tone. Focus on areas where light naturally hits your face to enhance the glowing effect. I like to apply this to the inner and outer corners of the eyes.
The timeless cheekbone sweep remains a favored blush application method for its universal appeal and effortless ability to enhance facial features. This approach begins with a smile, the key to identifying the apples of your cheeks, which serves as the starting point for your blush application. Gently dab your cream makeup, such as Seint makeup, onto this area, ensuring a light touch to avoid over-application. From there, the blush is blended upwards in the direction of your temples, tracing a path that naturally lifts and highlights the structure of your face. This upward movement is critical as it mimics the way natural light plays across the contours of your face, creating an illusion of depth and dimension.
As you blend, the trick is to maintain a feather-light touch, allowing the blush to seamlessly integrate with your skin for a look that’s both polished and vibrant. It’s important to consider the intensity of the color as well; a subtle hue can add just a hint of color for daytime wear, while a more vibrant shade can elevate the look for evening events. This technique is wonderfully adaptable, serving as a foundation upon which you can build or adjust according to the specific needs of your face shape or desired effect. Whether aiming for a bold statement or a hint of color, the classic cheekbone sweep is a testament to the versatility and enduring popularity of cream blush in achieving a natural, healthy glow.


Begin your journey to a flawless base by dotting Seints Cream Foundation onto your face, focusing on areas that typically require more coverage such as the cheeks, forehead, nose, and chin. With your chosen tool—whether a densely packed synthetic brush for precision or a damp beauty sponge for a more diffused look—start blending the foundation in gentle, outward strokes. Pay special attention to blending along the jawline and hairline to eliminate any visible lines, ensuring a smooth transition. For areas that demand a softer touch, such as under the eyes or around the nose, use the tip of your sponge or a smaller brush to meticulously blend without removing coverage. As you work the product into your skin, you may find that layering in thin applications achieves the most natural and buildable coverage, allowing you to customize the foundation’s intensity. By focusing on blending technique and the strategic application of product, you’ll create a seamless, skin-like finish that serves as the perfect canvas for the rest of your makeup application.